
If you were a visitor to my site in November, you might’ve noticed a lack of posts on the blog. While I’ve been producing videos and podcasts the whole time, I had a mental block on creating the short posts here on my website for each and just didn’t bother to write them up.
As we’re approaching the end of the year, I decided to get my act together and automate more of blog posts for my work, starting with podcast episodes.
That way I’d have no excuse not to do them, I could spread the news for my podcast more easily, and along the way put together a handy shortcut that I repurpose for my YouTube videos, articles on other sites, and eventually embedded shortcuts here on my blog.
To accomplish this, I built a Post Podcast shortcut that I can run each Friday when we release a new episode of Supercomputer.
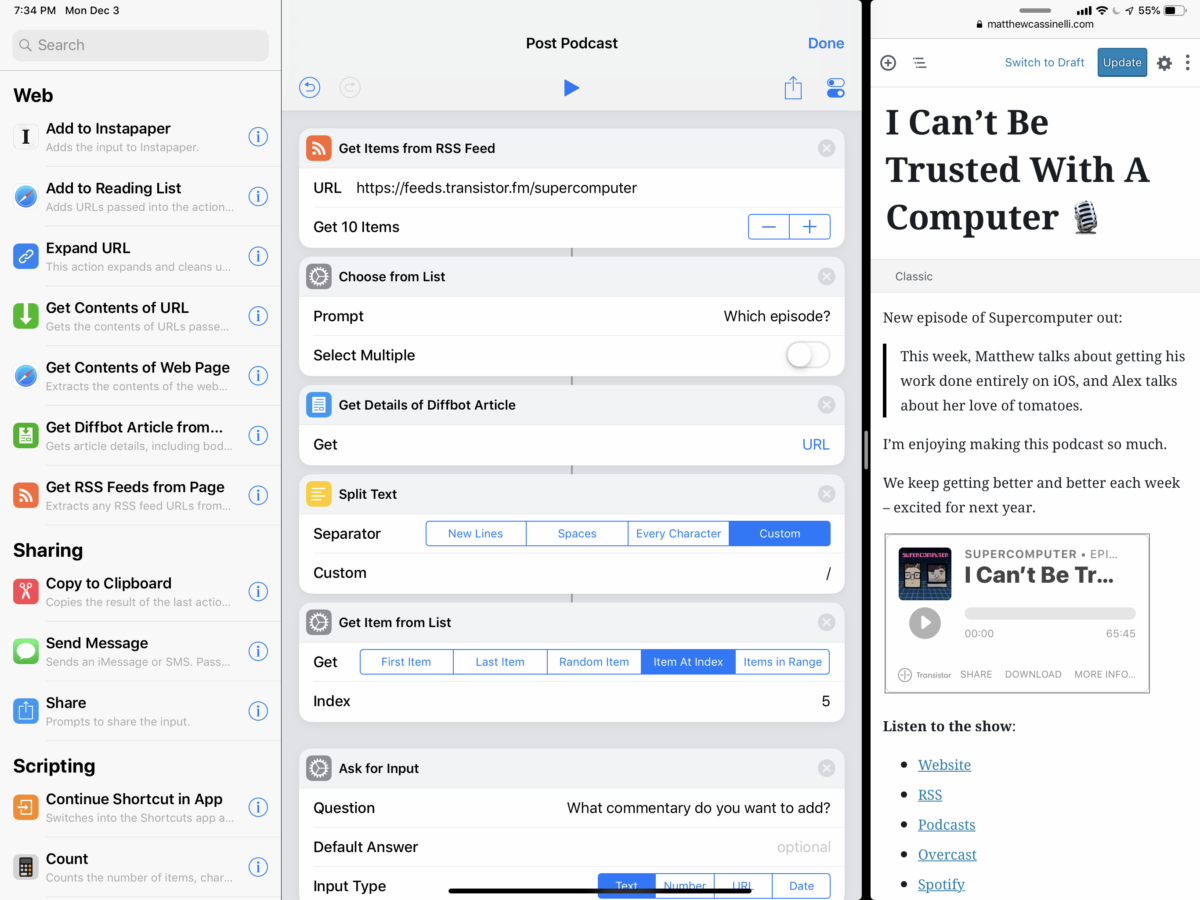
When I was finished, my shortcut was made up of four component parts:
- Getting the RSS feed of my podcast from iTunes and choosing the episode,
- Turning the title into a slug,
- Extracting the information for a Post To WordPress action, and finally…
- Manually grabbing the embed code for the actual episode itself so people can listen online if they want
Normally, this entire process would require a dedicated CMS—like the service Transistor we use to host our site—plus some fancy back-end scripts so everything can happen in the background.
Since I don’t have that, and am just one man, I wanted to make the entire process as easy as humanly possible so I didn’t avoid it again in the future.
Here’s what I came up with.
Getting the podcast feed from iTunes

I’m going to take zero credit for this portion and give it all to Matt Sayward, who heard my request for such a feature and sent me the following shortcut that extracts the original RSS feed for an iTunes-hosted podcast.
I was originally hoping it’d be possible to grab direct iTunes links to the episodes that’d open in the Podcast app itself, but that doesn’t seem possible at all with the iTunes API currently.1
But what this part of shortcut DOES get me is the original RSS feed for my show, which comes from Transistor, right from the iTunes show link.
Once I’ve pasted in a link, the Match Text action uses what’s called a regular expression is isolate just the right portions of the URL2, then Get Group from Matched Text grabs just the unique iTunes ID at the end of the link.
From there, the following URL action builds an iTunes lookup link with that ID and passes the URL into Get Contents of URL to grab the information from the web. The resulting information returns as text marked up in JSON dictionary formatting, which enables the next two Get Dictionary Value actions to look into the “results” data and gets just the “feedUrl”.3

Because RSS is a fantastic open standard that’s also used for normal articles, the Get Item From RSS action and Shortcuts functionality to get Articles from web pages are able to both work with the data coming from my show feed.
Grabbing these RSS items as Article media, I can extract Title, Date, Excerpt, Link, and more from each.
After that, adding in Choose From List lets me pick from the RSS items for just the right episode.
Later throughout the shortcut, the magic variable for that Chosen Item is re-used again multiple times – to format the body of my blog post, fill out the data for WordPress, and also build a unique slug.
Note: I skip the slug part for now, and come back to it later.
Formatting my blog post
Once I’ve gotten the individual chose item from the RSS feed, I wanted to extract all of the component parts to build up my blog post to near-completeness, requiring me to only fill in some extra commentary (and later the embed code for the episode).

To enable the ability to input the commentary live while the shortcut is in progress, I added Ask For Input with a prompt “What commentary do you want to add?”. That way, when the shortcut is run, I can add some thoughts on the fly4
Once I type in my commentary, that is used in the body of the subsequent Text action by placing the Ask For Input variable in the text field. 5.
In that Text action, I’ve added a boilerplate line introducing the new episode, following by an offset quote. That quote uses the Chosen Item set to Excerpt, which pulls the description already provided for the episode so I don’t have to rewrite it.
Under that my commentary text is placed, and then I leave a few lines blank for when I later want to paste in my embed code.

Then, under all of that, I’ve added standalone links for all the different ways you can listen to my show – on the web, in iTunes, in Overcast, on Spotify, and in apps like Castro and Pocket Casts. Like I mentioned before these are all direct links to the show itself instead of the individual episode – I couldn’t figure out how to get episode links since iTunes, Castro, and Pocket Casts all use unique ID strings in their URLs for each episode instead of the encoded title or iTunes overall show ID.
Still, that’s good enough – I want new subscribers to follow the show, and for everyone else this post is a reminder to check their podcast player.
Since this is all written in plain text, I then use the Make Rich Text From Markdown action to convert the marked-up text into actual inline links that WordPress can read properly.6
Magic Variables for Post to WordPress
Within the Post to WordPress action, I used Magic Variables repeatedly to set up the Title, Excerpt, and Publish date.

For the Title of the post, I use the Chosen Item from the RSS feed and, after tapping on the variable again, see that the Type is Article and there’s available details for articles7. Out of the options, I chose Title, which extracts the title of the article found from the chosen RSS item.
After that I appended a microphone emoji, part of what I’m using to signify podcast posts (vs a video camera for my YouTube video and a link emoji for linked posts).
The Type for Post to WordPress is Post, because I’m not creating a new page, uploading media, or adding a project – all of which have different parameters than the Post type.
For Format, I chose Standard – I’m not sure if its more “proper” for websites to share these as link posts, so I’m open to feedback.
My category is the Podcasts group here on my site, so every new podcast blog post I add will automatically be grouped there – for my future video shortcuts, I’ll change this, and if you want to pick the category, use a List and Choose from List elsewhere and fill the Chosen Item for that in here.
With Tags I’m just hard-coding “Supercomputer” and “podcast” in there, since I want more association when people are searching for the show and to be able to filter by all of my podcast posts down the line.
The Excerpt is also filled out with the “Excerpt” from the RSS feed item, which for podcasts is the short description provided for each episode. This way, the theme for my site will also show the description on the home page, with the post looking similar to the episode in the podcast feed (displaying a title + description).
Publish Date is also filled out using the Chosen Item magic variable, and in this case I don’t need to format the date any further because it fits with the WordPress style by default.
Building a new slug from the article URL
Under the advanced section, I’ve also added a Slug so that my URL is automatically set with supercomputer prepended to the front of the title.

The rest of the slug is filled out by a series of actions that I set up closer to the top just after Choose From List – I added these after I realized I’d need a custom slug, but since actions need to be arranged in order of the Shortcut operation I had to add it above Post to WordPress.
To get the original article link, I use Get Details of Diffbot Article right after Choose From List to pull out just the URL – that way the link is isolated and I can act on it in the next step.
After getting the URL, I then use Split Text to separate the inputted link by a custom separator. The part is aimed at isolating the end of our Transistor website links – they all append the show’s title in URL-encoded text, so if I can grab that I already have the title ready for another slug.
In this case, I’m splitting the text by the forward slash found throughout the URL, so that I can split the incoming website link into the individual sections of that link.
After splitting at the forward slash, I then wanted to get just the correct item – Split Text passes out a list of items, and at this point I needed to figure out which once I wanted.
To accomplish this, I had to figure out the index of the item in the list so that I could program to grab the title whether it was first, second, third, and so on.8

Since I didn’t want to count them manually or try to associate its place in the list with the current index, I instead turned to quick debugging technique – I added the Split Text magic variable to a Show Alert action to preview it inline before continuing.
When I did this, I saw that the correct URL-encoded title was the fifth line, so I’d need to use the Get Item From List action, get the “Item At Index”, and then enter 5 for the index.
While the reason for this section is custom to our podcast provider, the technique for getting items from indexes is still universally applicable across many shortcuts.9
The output of that Item from List is then used in the Slug field of the Post to WordPress action, along with another dash so everything is readable by computers as a proper URL.
Entering the embed code
Once the shortcut reaches this point in the action steps, my new blog post gets sent up to WordPress as a Draft post, and then as Output the Post to WordPress action returns the new URL. This is automatically saved as a variable, so that we can return to the new post in just a moment.
Before I open up the post to edit it, I want to grab the embed code from Transistor, which that enables people to play the podcast right from a website – that way my blog posts are more interactive than just a link out.
However, that embed code isn’t associated with the direct episode link on supercomputer.fm – instead, Transistor uses a custom Share URL with its own unique ID that I’m not able to generate on my own.
At this point, I was slightly stumped – that embed is an important part of what I wanted my posts to be. Since I couldn’t automate it entirely, I instead built in a quick route for me to manually grab the embed code and go back to the post on WordPress.

I realized that each of our Edit pages on Transistor’s back-end link out to those unique Share pages, so I added a URL action and Open URLs following it so I could jump into that page.
Then from there, I could tap the Share link to open the unique sharing page for every podcast episode hosted on Transistor, and from there grab the Embed Code by copying it to my clipboard, and then come back.

The URL I’ve built to open into the edit page uses the same variable from Item From List (which contains a URL-encoded version of the title of episode), and opens the final link into the Edit backend page.
After Open URLs, I’ve added Wait to Return, which enables Shortcuts to continue waiting in the background until I return the app to the foreground, after which it will continue on and run the rest of the shortcut.
Once I come back with the embed code copied to my clipboard, I then use another URL and Open URLs action to open back into the newly drafted blog post.10
Shortcuts will open into the new post, and I can paste in my embed code directly.
I’ll usually Preview it at this point just to make sure everything’s all good, but then I can post the nicely-formatted piece for my new podcast episode right away.
Preventing overwork from a thousand cuts
While explaining this shortcut takes 2,000 words, publishing these posts now takes me about 2 minutes – I can pick from the recent episodes, add commentary, the post uploads, I grab the embed link, paste it, and publish.
Instead of seeking out all of this information, typing it up, remembering my style guide, and doing this all from the small screen of my phone, I can just ask Siri to kick it off once I’ve published a new episode and I have my blog post up almost instantly.
In my opinion, this is much preferable to the month-long lag time I had for the Supercomputer posts that went out for our November episode.
Plus, I entirely removed a section of this shortcut from this write-up – I also take all of the same information and automatically log it into my Airtable database of published articles, making an API call seamlessly in the background11. (But that’s beyond the scope of this already long post).
For me, this is just one of thousands of little widgets with deep capabilities I’m able to create with Shortcuts – I now have the ability to automate important parts of my work, all from the phone in my pocket or tablet in my hands.
Get the shortcut, and see the full screenshot.1
Plus, while you’re here, subscribe to Supercomputer.
- In reality, sending people to the podcast page via link is likely aimed at new subscribers, so I want those people to go to the whole show itself anyway and add the show so they get all future episodes. Individual episodes are already downloaded in current subscribers’ podcast app of choice, so they’re probably not clicking these links anyway. ↩
- Look up regular expressions on Google or get a book if you’re interested in more – it’s a dense topic, but extremely valuable. ↩
- Web request and acting on JSON data using Get Dictionary Value actions are beyond the scope of this piece – worth looking into here within the Shortcuts User Guide for starters. ↩
- This language could be even more guiding by adding in “Chosen Item > Title” so I could see the episode title in context as I’m trying to leave commentary, but while building it I realized that’s only relevant for past episodes and each week when I run this I doubt I’ll lose my place. ↩
- I renamed it to “Commentary” using the Rename button that appears when you tap on an already-placed variable, just above what’s normally the keyboard area – see here for more. ↩
- Previously I had retrieved my whole embed URL at this point and pasted it in before uploading, but for some reason the code block messed up when being converted to Markdown and my app links weren’t getting passed to WordPress. Since this wasn’t working, I changed the order of operations and just get the embed code at the end – good enough. ↩
- Check out the Shortcuts User Guide section on variables for more – if you’re reading this all and you’re confused, it’s okay, it’s pretty confusing at first. ↩
- If you’re new to Shortcuts or programming, the “Index” is the position in a list of items – first, fourth, twelfth, etc. In Shortcuts, Lists are one-indexed, so the first item is at index 1, the second is at index 2, etc. ↩
- If the slug of RSS items from your provider doesn’t include a URL-encoded version of the title – make your own with a few actions! Get just the Title of the article, then Change Case to make it all lowercase, then Replace Text to switch any spaces with dashes. ↩
- Here the URL is also constructed using the same Slug structure from above, so I open directly into the new post instead of the default link. Post to WordPress returns something like https://www.matthewcassinelli.com/?p=781&preview=true, which is not the canonical URL – I ran into issues when I then wanted to share from that page. ↩
- The linked screenshot also includes another Show Alert that I used to check to make sure the API data was added successfully. ↩
- My Airtable API key isn’t included, but inside you can see the dictionary of data I’m sending along with screenshots of the Airtable API fields and example response from the corresponding section built custom for my table. Read this documentation from Apple on using APIs with Shortcuts – it uses the same Dark Sky example I wrote in the original Workflow documentation. ↩
